I used the lid from a Bed, Bath, and Beyond box (which I have LOTS of lately) and the last of my glittery copper spray paint (that I used most of on the wishing tree) to make a background for the card sign. After it dried, I fashioned some letters out of floral wire that I picked up from an estate sale and have used for many other things. The letters were wrapped in a rainbow ribbon that I picked up at Michael's just this morning, and hot-glued to the copper sign. Then I hot-glued on some left-over flower accents that I had. (Same ones from the butterfly cage and the archway centerpiece.) Finally, I used some fun-cutting scissors to make the edges of the sign pretty. Last, I attached a pin left over from making boutonnieres to the back of the sign, and pinned it into the lid of the picnic basket. I'm so glad it turned out so well! It's going to look great on the table under the wishing tree! :)
Sunday, June 24, 2012
The "Cards" Box
So I was thinking about the "cards box". You know...that thing people put out for guest who bring cards. I've seen stuff as out there and awesome as giant Lego blocks and as nature-y as bird cages and little trees with clips. I've also seen the boring old boxes with the word "cards" written on it and a slit in the top. So here's what I did....I found an awesome top-folding picnic basket at an estate sale for $5.
I used the lid from a Bed, Bath, and Beyond box (which I have LOTS of lately) and the last of my glittery copper spray paint (that I used most of on the wishing tree) to make a background for the card sign. After it dried, I fashioned some letters out of floral wire that I picked up from an estate sale and have used for many other things. The letters were wrapped in a rainbow ribbon that I picked up at Michael's just this morning, and hot-glued to the copper sign. Then I hot-glued on some left-over flower accents that I had. (Same ones from the butterfly cage and the archway centerpiece.) Finally, I used some fun-cutting scissors to make the edges of the sign pretty. Last, I attached a pin left over from making boutonnieres to the back of the sign, and pinned it into the lid of the picnic basket. I'm so glad it turned out so well! It's going to look great on the table under the wishing tree! :)
The Ceremony Archway
When I began to picture our ceremony, a lot of things came to mind. Many of those things have evolved since I began planning this wedding. One thing, however, has remained constant...I have always wanted an archway. I looked at renting them from a place here in town, but the only style that I liked wouldn't work well outdoors (and I didn't care for the styles that would have worked outdoors). My brother is an excellent craftsman, so I asked him to build us an arch that could later be converted into a porch swing. (That way it would serve a function later...and so I would have something special from my wedding that my brother made.) Unfortunately, he wasn't able to find the time to make it for us.
Luckily, Matt's mom had a friend from work who had an arch that we were able to borrow. It is absolutely beautiful! It's a white arch with wide sides that is heavy enough to work well outdoors. On a wedding shopping trip a long time ago, we picked up some floral decorations for the future archway. These decorations were long chains of greenery with 5 of the 6 rainbow colors existing as Gerber daisies every so often along the chain. We bought a matching Gerber daisy bundle in the 6th color, and I had to go through and manually add/rearrange the flower garland to include the last color.
For the center of the archway, I wanted something special. I thought about getting one big Gerber daisy and using spray dye to make it rainbow. But then I thought, "why spend more money? Surely I can come up with something....". And I did! Necessity really is the mother of invention...
What I did was first free-hand an "M" (my future last name will be Morrow) on the back of a lid from a Bed, Bath, and Beyond box. (Those boxes have been used for many things because of their abundance as of late! :p) I used a box cutter to extract my M. Next, I wrapped the M in electrical tape. Then I began the task of hot-gluing on some paper flowers that I got from Michael's a while back. (I used these on the butterfly cage, if you recall.) Finally, I hot-glued on some black ribbon for tying the centerpiece I'd just created onto the arch itself. I was definitely pleased with the outcome. :)
Getting The Word Out--Part II
Ok, so...I know I posted the prototype invite sheets a long time ago, BUT.....like all things, the invitations evolved before being sent out. :p First of all, I kept the paper mentioned before. (A seeded paper from Saveoncrafts.com.) I modified the wording using Microsoft Word, and printed them in color.
After printing, the pages were cut in half. (Two invitations per sheet of seeded paper.) The pages were then placed into ivory envelopes, sealed and stamped with an abstract tree rubber stamp using a beautiful copper ink. I really liked the design of the tree...I felt it was abstract enough to be elegant, yet real enough to fit the nature theme. Then a friend asked if it was supposed to be the white tree of Gondor....I laughed as I replied, "Not intentionally."....but now that he mentions it...I absolutely love that I went with it....even if it was a little unnecessary to stamp the back of each one. :)
Front of Invitations |
Back of Invitations |
After printing, the pages were cut in half. (Two invitations per sheet of seeded paper.) The pages were then placed into ivory envelopes, sealed and stamped with an abstract tree rubber stamp using a beautiful copper ink. I really liked the design of the tree...I felt it was abstract enough to be elegant, yet real enough to fit the nature theme. Then a friend asked if it was supposed to be the white tree of Gondor....I laughed as I replied, "Not intentionally."....but now that he mentions it...I absolutely love that I went with it....even if it was a little unnecessary to stamp the back of each one. :)
Back of Envelope with Tree Stamp/Seal with Stamping Block |
Thursday, May 17, 2012
Hooray for Bridesmaids!: Part II (Dying Sashes)
My bridesmaids will be wearing "conac" (copper) colored dresses as mentioned in a previous post. (See Hooray for Bridesmaids!) Each girl will have a different colored flower that they will be carrying down the aisle. To match the flowers, each will also have a sash in her color and they will be wearing black converse shoes with laces in their color. This post is about how I made the sashes. :)
After playing around in fabric stores browsing various fabrics, I decided to go with a 10% polymesh fabric. It was awesome because it lays really well and doesn't have to be hemmed because no one will be able to tell anyway! I found a sash in the perfect blue and another in the perfect green shade. I found a baby pink (not what I wanted!) and white. And that...was...it! I searched high and low for yellow, orange, the right pink, and purple, but alas...none was to be found. Not online. Not in any of the fabric stores I picked through. (including a trip to the metroplex that yielded no properly colored polymesh!)
Then it hit me...and I'm not sure why it didn't hit me sooner...why not just dye them? My future mother-in-law and I headed back to Hancock Fabric and bought four 1/4ft pieces of white polymesh. Later on, I lost a bridesmaid, so I only ended up dying 3 of them. (Long story, but don't worry...no one's feelings were hurt! It was just a dress mix up that ended with being short a dress b/c David's Bridal stopped carrying the style/color.)
So, after putting it off for awhile, I finally got motivated to dye the sashes. (Thanks Airicca!:p) To my dismay, the Rit dye required not just letting the sash sit in the dye, but also constant stirring...for 30-60 minutes!?!!!! So I naturally did what anyone would do...I hooked my laptop up in the kitchen and turned on a Harry Potter movie to pass the time. (The Chamber of Secrets for those wondering...) I worked pink first. After 45 minutes, the dye was setting anything brighter than a baby pink. I decreased the water and increased the dye. Still no luck after 15 more minutes. I decreased the water and added the last of the dye. I also heated the water over the stove to help. It got a little darker...but that was it. :( A little sad, I rinsed out the pot and the sash...to reveal a baby...like terrified of bright colors baby pink.
Then I tried Plan B...which it turns out should have been Plan A. I used the same dye that was used to dye my wedding dress tie. (Blog post about that one coming soon!) Voila! Worked beautifully!...and in a quarter of the time! It's a spray dye, so I laid down some plastic trash bags and sprayed the mesh. I had to sort of "rub the color in" to make the color smooth and consistent. I hung the sash on some hangers to air dry while I dyed the other sashes. Once they dried, I heat set them in the dryer and life was good. :)
Monday, May 7, 2012
Toasting Glasses
In my attempts to find decorations for Matt and myself for our toasting flutes, I found the cutest already-made-adorable wine glasses. They were adorned with hearts, rings, and the words "Mr. & Mrs.". To top it off...they were only $1 each! (Thank you Dollar Tree!) And with that, my search came to an end. But there's more to the story of toasting glasses than just ours...
While at an estate sale at one point, I met a man that knew Matt and his family. The man gave me a box of glasses and jars for free on the promise that I would use them in the wedding. So, I picked out some of the glasses (mostly mis-matched) to give to our family members who would be sitting at the family table with us. After a good washing, I set about decorating these. I didn't want to spend any money on decorating them as doing such was not really necessary, but it sounded like a fun idea, so I didn't want to leave them plain. After some scrounging, I found some lettering and some foam stickers. The results can be seen below. The top photo shows our moms' glasses and the second shows our dads' glasses. The bottom two show our brothers' glasses along side their girlfriends' glasses.
Sundae Table
Originally, I wanted to have a trail-mix table for people to make their own favors. So, I started collecting jars at garage sales and estate sales and we picked up some candy scoops and heart-shaped ladles. I even had the bags ordered. Unfortunately, as we got closer to the big day...that idea seemed too cumbersome in light of other preparations since we aren't going to be using a caterer. However, with the heat of the summer, why not have a make-your-own-sundae table??? I re-purposed my jars and created some tags using Microsoft Word. I affixed the tags using double-sided tape.
For a little color, I used some yarn that I picked up at an estate sale that Aunt Sharon had a while back. I cut strips of yarn in each of the colors I wanted to use, then twisted them as tight as I could. Next, I wrapped the twisted yarn around the jars and double-knotted them. Finally, I cut away the excess and moved the knots to the opposite side from the tags so that they didn't show from the front. Brilliant! And they cost me next to nothing. Most of the jars were $1 or less. (I found the very same ones at Wal-mart ranging from $7-$15 EACH!!! The yarn was all in a big bag of stuff that I took to help clear out some of the left-overs from Aunt Sharon's estate sale. I made and cut out the tags myself...so really, these adorable vessels were dirt cheap! Yay! The stuff to go in them may cost a bit, but at least the jars weren't pricey. :)
I also found some colorful soda-shop style straws at Micheal's of all places! They were $1/pack, so I got four packs...each a different color. I already had a neat straw-holder from an estate sale many moons ago, so that became wedding property.
And, just for funzies, here's a photo of some of the jars you've already seen taken from a different angle. I'm really pleased with how these turned out! :)
Monday, April 16, 2012
Throw-Away Bouquet
To make my throw-away bouquet, I picked up some polka-dotted faux daisies from Michaels'. I bent the stems a bit and cut them to an appropriate length to make a bouquet. Then I wrapped the stems together with floral tape and covered it in copper ribbon ("Firefly" was the name of the color) from Wal-mart. I then cut some copper leaves from a bundle of my Michaels' Christmas clearance treasures and hot-glued them onto the outer edges of the arrangement. Then, I hot-glued some copper berries from the Michaels' Christmas clearance stuff to the centers of each of the flower heads. As a final touch, I added some ribbon of each of the wedding colors to the stem...it came out cuter than I had pictured!
Photo Op Sign!
So I found some neat ideas for making photo op areas on Pintrest. I found some awesome large paper butterflies at Hobby Lobby that were the perfect wedding colors! I decided we would hang them in an arch and make a sign in the middle of the arch with our names and dates. For the sign, I cut out letters and numbers on variously colored scrapbook paper using fun-cutting scissors. Then I cut out shimmery copper paper rectangles and used spray adhesive to stick the colored letters onto the rectangles leaving a little room at the top. In the space on the top, I used a hole-puncher to make a single, small hole in the top of the single letters and multiple holes in the word/number blocks. I then used ribbon and string to tie each of the pieces onto a long length of ribbon/string. Finally, I strung them up to make sure that the sign looked the way that I wanted it to and adjusted pieces accordingly. :) The following pictures were taken in different kinds of lighting in order to give everyone a more real idea of how they look in nature life. I can't wait to decorate the reception building so that I can post a picture of the whole photo op area!
Just for Kids
We wanted to do a little something for the little ones at our wedding. So, I created a legal-sized page of fun little games and pictures to color using Microsoft Word. I pulled some cute clipart off of the internet and I made up some games such as a maze and a word search to go on these sheets. They wound up being super cute! I've even had a few of my attendants tell me that they want one too! We printed off 50...so hopefully that will be plenty for all the kids...and kids-at-heart. I also decided that I should give kids map pencils rather than crayons. ('Cause I'm a thinker! :p) I had a lot of map pencils laying around, so I had my awesome Dad cut them into two for me and set to sharpening them. I plan to put them in a little basket on the guest table to be given to the little kiddos as their parents come to sign the guestbook. :) I hope that they enjoy it!
Sunday, April 15, 2012
Centerpieces
So this particular post will be a work-in-progress.
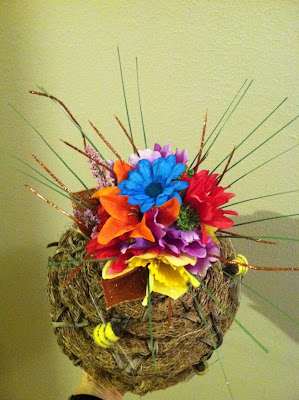
The centerpieces were created in two stages. First, I picked up a bunch of flower bundles from Micheals' that were on sale and cut the bundles into single flowers and laid them out in piles by color. Then, I played florist for a while by making all kinds of different small arrangements. Once I made one that I liked, I added a little greenery and then wrapped the stems in floral tape. From there, I placed each arrangement into one of the beautiful colored jars I had collected from sales at Hobby Lobby or Micheals'. After all of the arrangements were placed into the jars, I tied a little raffia bow around the neck and added a cute little floral butterfly to each bouquet. These looked lovely. :)
The plan is to place these on top of mesquite wood pedestals. I'll post more about how this was done after we actually get them made. In the mean time, here's a neat picture of what I'm planning on doing....
There was one other centerpiece that I made for the family table. I made an floral arrangement just as I had before, but this time I placed it into a cool-looking beehive that I found at an estate sale. I also added a few little floral bees around the outsides of the beehive. It ended up looking super-cute!
Wednesday, April 4, 2012
Great Journeys Start With Awesome Shoes!
They say that every great journey begins with a single step. While this may be true, I do believe that prior to stepping out, one must be properly equipped with shoes that are able to make said journey! :p And who wants to begin an adventure as amazing as marriage wearing uncomfortable shoes that most people won't see because of the dress anyway? (Plus, I want to be able to run in case of the zombie apocalypse! Hehe.) The point is, I wanted to do something I'd dreamed of for a very long time....wear Converse on my wedding day!
So, I did what any logical person would do...I tried to find shoes to match my wedding colors! And let me tell you...that was not easy! First of all, there are very few types of Converse out there that are rainbow...and those that are, are primary colors, not neons. I did manage to find a Google image of the PERFECT shoe...but...it seems that the website that the shoe comes from is in Russian...so ordering was a bit of a problem.
Then I got the bright idea that I could dye them myself using Airicca's wonderful spray dye that I had used on the flowers for the boutonnieres and that would be used for the dress tie. So, I found a white pair on e-bay for a decent price that were in good condition, washed them thoroughly, bought some insoles, and prepared to dye them.
At the last moment prior to dying...I had an epiphany. I should just
use sharpies instead! The colors would be brighter and I could more
easily control overlap! Knowing that this task would be time consuming, I
tested each of my colors used to create the directional signage on the
inner tongue of one of the shoes. They looked so vibrant! I was sold!
So I began the tedious task of working on the shoes. I started by
outlining the Converse logo and each of the eyelets with yellow. This
was surrounded by orange, then green, then blue, then pink, and finally
purple. At that point, the color pattern repeated itself. I did this for
both shoes.
Since there wasn't any logo on the outsides of the shoes, I had to get
even more creative. On one I scripted the word "Love" in black, then
outlined things as I had before. The other shoe proved more difficult. I
couldn't spell out "Love" again because the "L" would be small and the
"E" large due to the natural curve of the shoes. So, I drew a heart and
wrote "M + J" inside in black sharpie. This design was, again, colored
according to the previously established pattern. The results were
spectacular! I can't wait to wear these!!! :)
The Butterfly Cage
I loved this idea! I looked up prices for ordering butterflies...and determined that it was WAY out of our budget. (We are talking $65-$95/dozen!) I couldn't believe they were so pricey! I looked into breeding my own as well, but that was not really any cheaper in the long run. Then I thought about capturing them myself (along with some friends) and putting them in decorative baby food jars for each guest. But that seemed crazy with the number of guests we are planning for.
Just when I had given up on the idea...I was presented with another option...what if we just released all that we could catch at once instead of giving an insect to each guest? BRILLIANT! I began looking for a birdcage with bars close enough together that they would not be able to escape. After a few weeks of searching, my former roommate, Nathan, texted me about some potential bird cages that he found at Hobby Lobby. I rushed to the store and purchased one of these cages.
The only problem was that the cage was blue. It was the right blue for the wedding, but I still wanted it to be copper instead. I had a copper leafing pen at home and proceeded to color the entire cage with this...it took forever! I left the bird and flower on either sides of the door in their original blue, but the stems and leaves from this design were colored copper. I also colored the chain at the top as well as the door and its handle.
After a LOT of hours, I had the cage foiled in a shimmery copper that I was happy with. Now it was time to figure out how to add the wedding colors to this copper creation! I started by hot gluing a green ribbon with dragonflies around the design border already present on the cage. Next, I hot glued on a few flowers to the center of the blue metal flowers that I didn't foil. Then, I hot glued on the same sorts of flowers in each of the wedding colors in a grouping on the door to the cage. Finally, I clipped on some floral butterflies. This is going to look great on a Sheppard's hook at the ceremony! I can't wait to release them as we exit the ceremony site! I hope everyone makes good wishes for us! :)
Subscribe to:
Posts (Atom)