Saturday, March 17, 2012

The Whiskey Box

     One of my best friends, Airicca, told me that she had read about a couple having a "whiskey ceremony" at their wedding.  The idea was to place whiskey in a box along with letters telling why you love each other and to seal it the day of your wedding.  Whenever you have your first big fight, you are supposed to break open the box, take a shot (or two) of the whiskey, read the letters, and remember that no matter how tough things get, you love one another. I thought, "WOW!...We have to do this at our wedding!".  
     I searched high and low for the perfect box...most were either too big or too small.  Then, out of nowhere, Matt's Aunt Sharon found one that was absolutely perfect for us! It was an old cigar box, but it was pretty good sized.  I showed Matt and he agreed that we could get a pint of whiskey in there. (Hopefully we wouldn't need more than a pint anyway! :p) Matt is in charge of procuring the whiskey, but I sure hope he gets Forty Creek! :)
     I set about trying to decorate the box. I went to Hobby Lobby and discovered the art of working with creative metal (really thin squares of metal that are easily shaped).  I bought a pack of copper squares and a texture roller.  When I got home, I played around with the metal a bit and got a good texture to put on the middle of the box to cover the castle and cigar brand that was imprinted on the box.  Before hot-gluing the metal down (because I was too cheap to buy special metal tape), I placed a 86 cent green rub-on letter I had found on clearance at Hobby Lobby in the center of the textured metal square.  After affixing the metal square to the box, I rolled some of my Firefly ribbon and hot-glued that around the edges for a softer look.
     Next, I cut some of the squares into pieces and textured them to cover up some writing that was in the lower right hand corner of the box lid. To make everything match, I put metal pieces on the lower left and two upper corners as well. To soften the edges of these and to add a little bordering, I used some ribbon that we had gotten early on from Micheal's that was green with purple dragonflies. The dragonfly is highly symbolic in Japanese culture.  They are said to have been first honored by the great founding emperor, Jinmu, after a dragonfly captured and ate another insect that had bitten the emperor. They have become an integral part of Japanese life symbolizing success, happiness, strength, and courage.  (After reading that, I attempted to put dragonflies into the wedding any way that I could!)
      For the final touches, I cut some of the glittery green and copper leaves from my Micheal's Christmas clearance stash and hot-glued them together. Next I rolled up some of my purple ribbon (also from Micheal's) to make little flowers and hot-glued those to the center.  I made four of these and hot-glued the accents onto the four corners of the metal square in the center.  It turned out super cute!

          
     On the bottom/back, I placed some an orange paper (which had fun-cut edges of course!) that contained a poem that I wrote. 


In case it is hard to read because of the flash in the picture, I've written it out below:

Whiskey Box Instructions

For times with far less ups than down,
For times when smiles turn to frowns,
For times when money gets tough to find,
For times when you feel you’ve been out-shined,
For times when illness seems to prevail,
For time spent waiting for a chance to exhale,

Open this box when on the brink…
Of mental exhaustion,
And take a drink!

Then read these letters, these reminders of love,
Then smile and kiss as you both rise above,
All the hard times of life, all the cold, rainy weather,
For there’s nothing in life that you can’t do together!

Making of the Wishing Tree


       Some days my creative side really comes out well! As I began thinking about how to make a wishing tree, I started talking to my future mother-in-law about how I could construct such a thing. She mentioned placing wishes in a hole rather than clipping/tying them onto the branches. So I went home and found a box from a vacuum cleaner that we got for Christmas. I cut out a hole and removed the back side (opposite of the hole). Next I affixed a small box beneath the hole on the inside of the box using duct tape. This was to catch our wishes!
       Next I took some brown paper that came from packing material inside the boxes of some things I had ordered from the wedding, and fashioned them around the hole. I hot-glued this down. I used the brown paper to cover the other three sides of the box. I again used hot glue and was sure to leave natural wrinkles to make it look like bark. Then I made a little branch coming out of the hole for a cute little owl I found at a garage sale to sit on. Once that looked the way that I wanted, I took my creation outside and spray painted it with the same glittery copper spray paint that I had used to color the leaves for the boutonnieres.
      As the tree lay drying, I took the back piece that I cut from the box in the beginning and drew a tree-top. I cut out the tree-top and painted it a pretty green shimmery acrylic paint that I had laying around the house. After the paint dried, I used a black sharpie to write “Leave your wishes for the Mr. & Mrs.” on this. I then hot-glued some glittery green leaves I had found on sale after Christmas onto this sign. I also made sure that this would stand up on its own using extra pieces of cardboard and, of course, LOTS of duct tape!
       For the final touch, I hot glued my little owl into place on his branch and placed the tree-top on the top of the trunk I had created. My grandmother-in-law-to-be found a cute ceramic squirrel figurine at an estate sale that I plan to use to hold pens and pieces of paper shaped like acorns for writing wishes upon.

Wishing tree before spray painting
the trunk or decorating the top.


Wishing tree after spray painting and decorating.


Developing Our Unity Ceremony

     As we began thinking about incorporating a unity ceremony into our wedding, I think we knew more about what we didn't want than we did about what we did want.  We didn't want to do the candle thing because you blow out the candle after the wedding...and I don't like the idea of that.  We thought about sand, but that wasn't really us...and how could we pick just two colors? (I mean, Matt would obviously be orange, but how could I choose?) The same was true for salt...though I did like the symbolism associated with salt. (In biblical times, merchants would make covenants by swapping a little bit of salt into one another's salt pouches. As long as the salt from merchant A couldn't be separated from the salt belonging to merchant B, the deal was binding.)

Sushi Ceremony?!
     After a lot of thought, we came up with a fun and unique idea...we wanted to make sushi!  First of all, we love sushi. Second, Matt had been learning how to make it. Third, how many people can say that they made sushi at their wedding? It was perfect! I wrote up a whole reading created that explained the symbolism behind everything that was going into the sushi. Here's a few excerpts:

About Making a Meal Together:
"Creating a meal together is a bonding ritual that people engage in to show their appreciation for one another. This act is symbolic as various ingredients, such as different aspects of their own personalities, are combined to create an incredible dish of love. This dish must be prepared using s traditional recipe, meeting, courting, falling in love, but to make the dish truly your own, you must add in your favorite seasonings, such as laughter."

About a Higher Power and Family:
"To make a sushi roll, the couple begins with a sushi mat. Without this, the couple could never create the sushi, it is an integral part of the process of coming together, and represents a higher power. Next the couple lays down a sheet of “nori” or seaweed. This will be the part of the dish that encircles everything inside and holds things together when everything seems to fall apart. The nori represents family.

"After rolling theses ingredients together, they will cut them into 6 pieces. 2 are given to Johnica’s parents, and 2 to Matt’s parents. The remaining 2are  eaten by the couple themselves.  This act of ingestion as a unit represents the melding of the two families who will each have grown larger after this day."

About the Rice:
"Next, the couple adds sushi rice to the roll. Rice is traditionally thrown at weddings because it represents protection, fertility, and money. Things that all newly wedded couples need! The rice also holds things together, much like the nori, but it also fills up the roll, and gives it substance and a very distinct flavor. The rice represents their love for one another as it protects them from harm, prepares them for creating a family of their own, and sustains them with enough wealth for a comfortable living."

About the Salmon:
"Now the couple will add salmon to the roll. Salmon has long been considered a symbol of knowledge, wisdom, and determination. Fish in general are deeply symbolic in a religious sense, and have come to represent things such as happiness, luck, creativity, adaptability, faith, and unity. The salmon in this dish represents all of the things that make them unique individuals as well as a unique couple."

About the Veggies:
"Finally, the couple adds in vegetables to represent themselves, the cucumber represents Johnica because it is green in color and represents life…which is her passion to study. The carrot represents Matt because it is orange (or course!), and because it is full of starches, just like Matt is full of energy."


     Sadly, in the end it was going to be too costly, and too cumbersome for an outdoor wedding, in Texas, in July. (Plus not all of the parents were as excited about eating sushi as Matt and I were.) So we scrapped that idea (despite its obvious awesomeness) and continued looking for something else.

Family Flowers
   Upon further research, I found where some people had used roses for unity ceremonies.  Many people, apparently, will have a batch of white roses on one side and red roses on the other. The couple would take one rose from each and put them together into another vase to symbolize their unity and the joining of their families.  We decided to use colorful faux gerber daisies (as I don’t like roses, and we weren’t using real flowers) to symbolize our unity and the coming together of our families. 
      As you know, we had six wedding colors, so we needed a flower of each color. Each of us comes from a family of four.  We decided that we would have our mothers hold the flowers that represented us...orange for Matt, and pink for me. (Why pink you ask? Because I wanted my side to have the pink, blue, and purple and Matt's side to have the orange, green, and yellow...and my dad and brother really didn't want to have to hold a pink flower. :p) Our fathers held the flowers to represent our parents....green for the Matt's and purple for mine.  Our brothers represented...well...themselves.  Derek (Matt's brother) held yellow, while Jake (my brother) held blue.
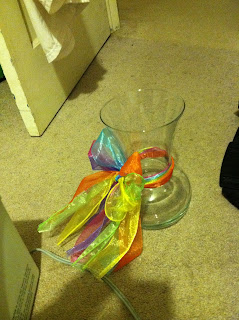
     One of our mutual friends is set to read the symbolism of the flowers before the ceremony starts.  The plan from there is for another friend to sing a Phil Collins song that I love as Matt and I go collect the flowers from our respective sides, hug our family members, and return to the center to place the flowers in a single vase together. The vase has six different colored ribbons tied around its neck to represent the individuals coming together.

Tying the Vase and Making the Flowers 
     We found the vase at a garage sale for a dollar.  Using the six colored ribbons from Micheal's that I had used for everything else, I tied on a pretty bow. Like the flowers, the bow represented the coming together of our families. I had three colors on one side of the bow and the other three on the opposite side.  I really liked the idea of the six colors being tied together in a bow that surrounded the vase for our unity ceremony. 


     To make the flowers, we purchased six faux gerber daises from Hobby Lobby. (Yes, the same ones that I got for the bridesmaids.) I cut the stems and wrapped each of them in a matching colored ribbon.  I hot-glued the ribbons down and that was that! 


Thursday, March 15, 2012

Journey to the Ceremony Site


      Anyone who's ever been to Sikes Lake knows that getting in and around isn't easy if you are new to the area.  You have to drive passed the Wellness Center to a small parking lot, then walk to the Sikes Lake Center unless you get lucky enough to find parking up close to the SLC.  And we were going to ask our guests to go just a little bit further to an open area where we plan to have the ceremony...so we needed to make sure that we can clearly instruct our guests on how to do so!  

Directional Wedding Signage
     To make some "wedding this way" kind of signs, I picked up a few scrap pieces of wood on clearance at Hobby Lobby.  I purchased a wood-burning tool, and began my project using a pencil to sketch the arrow and text onto the scrap wood.  Next, I traced my lettering with the wood-burning tool...which, if you've ever done this before, you know to be a tedious task.  After letting them cool for a bit, I used sharpies in the 6 bright wedding colors to trace around the lettering and arrow.  I traced around everything, alternating colors as I went along.  This was, again, a time-consuming task.  After the whole of the sign was colored, I created two bows from my Firefly ribbon and hot-glued them to the back of the signs.  I made four signs in this way, and despite that fact that they took much more time than something so simple should have, I'm very happy with the way they came out!
After wood-burning, before color.
After adding colors and bows.
The Ceremony Seating
       Now that the signs were ready, it was time for preparing other ceremony funzies!  Since our ceremony was to be held outdoors adjacent to Sikes Lake, we needed to consider seating arrangements for our guests.  Chairs were going to cost us an arm and both legs (so what’s the point of the chair? I ask you, what!?) to put out on the lawn. I really wanted to have a picnic style ceremony.  I wanted blankets laid out all over the place. But everyone seemed to be against the idea.  I began to compromise by saying that I would be okay with having some hay bales up front that would be decorated to look less hic-ish for the older folks who couldn’t get down on the blankets. Unfortunately, this still wasn’t enough of a compromise…apparently….so….I gave in and went with chairs.  Which meant I had to find people to set up/break down the chairs and think of decorations for said chairs.  Luckily, between our parents and friends, we think we will be able to find plenty of chairs for everyone so we won't have to rent any.  And I'm working on putting together a crew of people who will help with breakdown while we are at the reception. So, not to worry! You won't be asked to get down on a blanket for the duration of the ceremony!  Unfortunately, the chairs aren't going to all look the same, and chair covers are WAY overpriced, but I suppose it could be much worse. The way I see it, this gives it a little character and means more money for other, more important wedding things. :)

Chair Decor Plans
     To decorate our chairs, we ordered organza sash fabric from save-on-crafts.com. They had, what appeared to be all six colors...dead on. However, once the sashes arrived, it seemed that all of the colors were PERFECT...except for one. The green should have been a lime-type bright green...but it didn't look that way at all. When I looked back on the website, it looked like someone had accidentally sent me the "moss" green rather than the "apple" green I had ordered. I made a call to the customer service people to ask for a replacement.  The lady who spoke with me was nice, but not very helpful. She told me that I would have to return the fabric (at my own shipping expense) and that she had ordered the proper color for me.  A few weeks later, that color arrived...the SAME color it was before! I called back...another jolly, but unhelpful lady. She offered to send me the "moss" and the "sage" instead of the "apple" since that color was obviously not what I wanted...despite the color's appearance on the website. I told her I was looking for a color as close to a lime green as possible...she said...and I quote, "Well...we have an olive...that's sort of like lime green...maybe brighter!". What the...? Since when? And on what planet? These people obviously had no clue what I was looking for in my desired shade of green. So, after shipping back three different wrong-colored sashes, I gave up and decided to nix the green unless I could find them somewhere else. I've searched high and low for lime-green organza...and let me tell you...not easy to find. As the search for the perfect green organza continues, I will soon be looking up how to make organza chair bows...that's my next big project! :)

The Aisle Runner
     Because we will be outdoors, I wanted to have a grassy aisle.  Rather than create a runner to throw over the natural beauty of what will hopefully be lush greenery, I would like to have the aisle lined with tree branches. I saw a wedding photo of a couple who did this in the woods and I really liked it.  Of course, I would have to throw in some sheer copper fabric and bright colored flowers for accents, but you get the idea! I can't wait to see this! :)
  
Other Ceremony Decor
     My mom and future second mom and I found some Christmas lights at garage sales that we plan to use in either the aisle sticks, on the lamp posts, or both for decoration.  I'm still playing around with the idea of that....
     I'm also playing around with the idea of sidewalk chalk...perhaps a poem, broken up in lines leading up to the ceremony site? It's a work in progress! :p
    I also have a really awesome looking chalkboard.  On this, I plan to used colored chalk to write out the wedding cast list on one side and the order of the ceremony on the other.  This is my way of saving paper by not printing programs that everyone will eventually just toss into the trash!
     The last bit of decor to discuss at the moment is what will be behind us as we say our vows to one another.  We wanted an archway to symbolize our entry into a new life as man and wife.  Archways are symbolic as gateways that lead us onward into new frontiers. The most extreme example of this is the St. Louis Arch, also known as the "Gateway to the West". I like this, but what was I going to do with an archway after the wedding? And renting was a hassle...though not all too expensive.  Then we came up with the idea that we could have a porch swing behind us...decorated with greenery and colorful flowers. This not only was something that we could forever keep...it was something to remind us of our wedding day. :) (Plus it would make for great post-ceremony photos!) Lucky for me, I have a fantastically talented brother who was willing to build one for me! (What a guy!)  I can't wait to see how it turns out!! :)

Keeping Guests Cool
     Since we are doing an outdoor July wedding in Texas, we decided that we really needed to think about keeping our guest cool and happy even though they wouldn't be outside long.  To accomplish this, we first set the time in the evening...about 7:00pm.  Then we came up with the idea of creating fans.  At first I didn't want to do them because of the paper usage (we were really trying to use as little as possible to be ecofriendly), but in the end, I knew I really wanted them, and that my guests would appreciate them!
     We chose cardstock in as many of the wedding colors as we could and printed two fans/page using a design I created on Microsoft Word.  Next, we cut the fans out using a straight-edge paper cutter and folded them over to make our little fan.  Then I used decorative scrapbooking scissors that I had laying around the house to cut them into various shapes (and accidentally into different sizes too).  These were stapled onto a wavy craft stick. (Which I bought at Hobby Lobby.) I didn't like the way that the staples looked...especially since there wasn't always a clean hit due to the thickness of the sticks.  Then I remembered some foam stickers I had got for the wedding without knowing what I would use them for...(don't judge me, they were the right colors, had butterflies and flowers, and I found them at Dollar Tree)...so there! I used the cute stickers to cover the mess-ups...and thought they looked great! So I just put them on all of the fans after that! :P
     I also needed a basket to hold the fans for distribution.  We found a cute basket at a garage sale that had some metal sunflower on it, so I added a little ribbon and a few glittery copper flowers from my Micheal's Christmas clearance stash. Voila! Cute fan holding device!


Monday, March 12, 2012

Getting the Word Out

One of the most fun parts of having a wedding is telling other people about it! As I began to think about invitations and save the dates, I flipped through magazines and online sites trying to decide what I wanted them to look like. These ranged from simple to super-complex and fancy. However, the prices were outrageous! Plus, I couldn't let someone else get paid to have the fun of making my invitations! :p

First things first. Paper is expensive. I also wanted to do my best to not be wasteful, so I tried cutting back on when I could. Because of this desire to save money and be ecofriendly, we decided to do electronic save the dates, plantable invitations, and to ask for people to RSVP on our wedding website.  At first I thought, “I can’t send electronic save the dates because not everyone has an e-mail address.” FALSE! Matt’s grandmother is in her 70s, lives in a tiny Texas town in the middle of nowhere, doesn’t even have a Facebook, and STILL has an e-mail address. And if people say that they don’t check them often, by you asking for the address, they know that they should be expecting something so they have no reason NOT to check it now.

The same is true for an online RSVP. Emily Post’s website even says that there is nothing wrong with this request. (I checked it out!) Actually, the history of the RSVP makes it okay! Originally, no response card was sent out because people had their own personal stationary and they knew that a response was proper etiquette, so they simply wrote back. Later, as people stopped having their own stationary so often, it became proper to mail a separate envelope with a response card to be mailed back to the wedding host.  With the advent of telephones came the RSVP via calling, which became proper. Now, we have the technology to do everything else in our lives online…so again, the times, they are a-changin’! As society evolves, so does the way that we communicate…therefore, so does our perception of what is proper etiquette when it comes to asking our guests for our wedding to let us know whether or not they will be coming!  *Bonus*: You don’t have to double-up on your postage bill, and you know immediately how people have responded instead of waiting on snail mail. Plus your wedding website will often link up to your online guest list, so you don’t even have to enter anything in yourself! (YAY technology!!!)

Despite this rational, I did eventually break down and make some paper ones for a select few people who didn't have e-mails, didn't want to give me their e-mails, or who just really wanted a paper version.  I created them in Microsoft Word and added a photo of us within a heart. As an added bonus to saving paper and money, my brilliant mother suggested that we make the few paper Save the Dates that we did send out the size of postcards. This meant that we could get more StDs (hehe) with less paper because we could make 4/page rather than 2/page, it meant no envelopes, and it meant $0.22/StD rather than $0.44/StD. (Like I said, she’s brilliant! :p) We sent out around 60 of these. One thing I really liked about them was the fact that I was able to print out addresses rather than having to write them out since these weren’t the invitations. (Thanks again, Emily Post!) I also liked saving money by not having to print out, and put on return address labels since I could just print the return address straight onto them since I made them myself. But my absolute favorite thing about these was the QR code that my fiancĂ© showed me how to make to put on them! I had no idea that creating these was so easy. (Google “QR code creator” to see what I mean!) The QR code linked directly to the wedding website….Yay technology again!!


 For the electronic StDs, I found a great site (punchbowl.com) that offers free e-cards. I designed my E-StDs (hehe again…) and sent out about about 200+ of these. I loved making them! I got lots of compliments from people about them. I loved them so much, that I decided to use more e-cards from this site whenever possible. I have played a bit and made the invitations for my bridesmaids’ brunch, bachelor/bachelorette parties, and the rehearsal dinner! (Although I'm not sure what will be used and what will just end up being for funzies.) Again….adorable, eco-friendly, and best of all FREE!

 Invitations, on the other hand, have NOT caught up with the times in terms of being electronically acceptable. It’s still considered improper etiquette to do E-vites for a wedding. (Which was totally cool, because designing them in Word was half the fun!) So to make things a little less wasteful, I designed them to be able to print two of them per page.  We printed them on seed-studded paper ($10.00/25 sheets = 50 invites) that I got from save-on-crafts.com. On the back of our invites, we asked people to plant the invite after the wedding.  Not everyone will actually plant them, but if even one person does, then you have saved one piece of paper from the trash. I thought about adding ribbons or overlays to these, but then I realized that that extra fluff was really a waste in the first place, and was also something that would have to be removed prior to planting.  Therefore, I concluded that simplicity was the way to go on this one! They looked great when all was said and done!


The website I ordered the paper from also had seeded envelopes, but they were kinda pricy…so we just used ivory-colored regular paper envelopes.  I also modified a pre-made template for return address labels that were clear. 

Oh...and Hooray for Groomsmen Too!

As is par for this sort of thing, the Groomsmen had far less involved in the way of their attire.  Since we found a dress at David's Bridal for the girls, it was only logical to head over to Men's Wearhouse so that they guys would match.  They, like the bridesmaids, would be in cognac with splashes of their individual colors.  We picked out a patterned vest to go over white, long-sleeved shirts (which would be rolled up to the elbows).  We figured most guys already have a pair of black dress pants (and if they don't, they should!) so that was all that they had to rent.  I didn't care for the tie selection that they had, so we went to JC Penny's and found solid ties in each of the right colors. I have no clue what Matt wants them to do for shoes. All I know is that they will not, unfortunately, be wearing Converse like the girls as Matt hates Converse. :( Oh well...I let him win that battle.

For their boutonnieres, I bought some white gerber daisies for a dollar at Wal-Mart and then used an amazingly awesome friend's spray-on dye that she had used for her wedding one year earlier.  (LOVE this stuff...btw!) The dye was a simple as spray-on, let dry, and then heat-fix in dryer.  I pulled the flowers off of the stems, cut away excess plastic, and dyed them each a different color. Then I purchased some multi-colored raffia from save-on-crafts.com, which I cut into strips.  Each boutonniere received two strips of each color, which were wired together using the wire from two corsage leaves that I had spray painted a shimmery copper color.  Each of them was then fanned out to look more full. Next, I hot-glued the strips to some cardboard squares that I cut off of a scrap box I had laying around the house. I hot-glued the flower of choice on the opposite side of the strips from the cardboard square, and proceeded to hot-glue a copper berry that I harvested from a bunch that was in more of my Micheal's Christmas clearance findings to the flower's center.  Each boutonniere was then given a stick-on back pin that I found in a pack of 10 at Wal-Mart. They turned out better than I had pictured in my head...which totally made my day! :) (P.S. I took the pink picture a different day than I took the others...it really is the same size as the other five and it really is a little more hot pink than it appears.)


Sunday, March 11, 2012

Hooray for Bridesmaids!


 Six beautiful bridesmaids, six beautiful colors! Originally, I wanted my girls to each be in a different colored dress that was made from a pattern that I chose early on.  But, like all things, this idea evolved over time. After incorporating copper, I decided to have them all in the same dress with different colored sashes instead.  I found a dress at David's Bridal that I really liked, and it worked well on girls of different shapes and sizes.  My girls ranged from tall to short and two of them had just had babies 7-8 months before the wedding. I needed a dress that would make them all look good...and I found one rather than having one made. It was largely out of convenience for everyone, but in the end, I think it really was better than my original plan.  I was able to get the dresses in a copper color that DB referred to as "cognac"...which made finding matching vests for the guys super easy.  With the original plan,
we would have had to make the vests in addition to the dresses.

For the sashes, I found a fabric known as "polymesh" at Hancock's Fabrics that was perfect in terms of how it laid, and its overall look.  Unfortunately, it was only available in two of the right colors: teal and lime green. There was a pink, but it was a baby pink, not a fushia, and there was a white. We found out we could dye the white ones using Rit...so we bough 1/4 yd of the teal and the green, then four of the white and some dyes. I haven't had a chance to dye these yet...but I'm hoping that they work out well! The best part about this material is that the way it lays and ties, there is no need to hem the sashes, and they can be reused later as something else...a scarf, belt, again as a sash, or even as scrap fabric for a project! :)


I also wanted for them to wear low-top Converse All-Stars rather than dress shoes. I went back and forth on colors and had a hard time finding the right shades, so I decided to go with all of them being black. I'm in the process of looking for some brightly colored socks and shoelaces! :)


I wanted each girl to carry a single flower that was their particular one of the six wedding colors.  Each flower was flanked by matching ostrich feathers and had a small floral monarch hot glued near the center.  The feathers were secured by floral wire and the entire stem was then wrapped in shimmery copper ribbon.  The end was hot-glued so that it looked nice on the bottom.  As a final touch, I added a matching bow with tails tied just under the flower’s head.  They looked great! I was glad that they turned out so well!


Little Attendants DIY


Let's talk about the little ones! We decided to have a flower girl from my side of the family, and a ring bearer from Matt's side. We wanted them to match us rather than the other attendants, so there was some fun DIY involved. 

Our Flower Girl: Callie Jo Freeman 
First of all, we needed to figure out what our flower girl would be tossing about the aisle.  With this being an outdoor wedding, we couldn't use faux flowers.  (It's difficult to find anything other than rose petals anyway...and I definitely didn't want rose petals!) We thought about real petals from other flowers but they were pricey and it was one more thing that would have to wait until the last moment.  After doing a search online, I found something that was absolutely perfect...butterfly-shaped biodegradable confetti!!! Step one, complete.

Next, she needed something to carry down the aisle to hold these water-dissolving butterflies. I took a basket, some colorful ribbon, and some fun multi-colored polka-dot fabric and created, what I consider to be, an adorable vessel for our biodegradable confetti. The basket and ribbon came from Micheal's, and the fabric was some scraps that I happened to have laying around the house. It didn’t take all that long and I only suffered a few minor glue-gun burns and lost a little blood from a wired ribbon poke. All in all, it worked out nicely, and was worth the pain. :p


I felt she also needed a cute corsage to go with her dress.  I found a white rose in the wedding section of Hobby Lobby near the other corsage/boutonniere supplies that was only a dollar.  I took this home and proceeded to color some of the petals different colors using sharpies.  Then I pulled off some copper leaves that I got on clearance at Micheal's after Christmas and hot-glued the whole thing to a velcro-adjustable corsage wristband. It turned out even cuter than I had pictured when I picked up the flower that morning! 


Our Ring Bearer: Triston McCalluer 
We decided that we didn’t want our ring bearer to carry a pillow.  Instead, Matt wanted him to carry a pop-open tennis ball with rings inside, and I wanted to have him carry a bird’s nest. As I was the one making everything...I won that battle. :p I found a cute nest and some feather/Styrofoam birds at Micheal’s.  The nest was a little deep, so I fashioned a hoop out of floral wire and stitched some of the same fabric used for the flower girl basket around it to form a little “drum-looking” pad.  I hot-glued this pad’s sides to the nest on all but one place.  I then took the same ribbon that I used for the flower girl’s basket, twisted it, and hot-glued the ribbon around the sides of the pad. I tucked the ends of the ribbons underneath the pad before hot-gluing it down. I then clipped my little birdies to the sides and sewed in some fake rings to the center for the final touch.


Like I felt about the flower girl, I felt Triston needed a boutonniere. I made him a smaller version of the one that I made for Matt, but instead of putting a copper berry in the center, I hot-glued the center from a glittery mini-poinsetta that I harvested from my Micheal's Christmas clearance crop. It's going to look great on his little vest! :)


Choosing Our Colors


In the beginning, I wanted my bridesmaids to be dressed like fairies. (And a few of them would have gladly done so!) My fiancĂ© vetoed that idea really quick. But that’s okay, because that gave me the power to veto his wanting an orange tux (I know…it made me want to throw up too!) We went back and forth on colors because he HAD to have orange somewhere in the wedding colors and I didn’t want an all orange wedding. One of my bridesmaids and I came up with the idea of doing a bright orange, a grassy green color, and a chocolate brown to make it earthy. He vetoed that as well! He said he felt like I was settling and that I was too bright of a person to do earth tones for my wedding. (Ugg….I could have totally done earth tones!) But in the end it all worked out because we finally settled on doing neon rainbow colors.  I had 6 bridesmaids and 6 neon colors that I though looked great together. It was perfect! One more thing to check off my newly built and ever-growing to-do list!


I love the symbolism that comes along with rainbows.  They are symbolic of God’s promise to Noah, his family, and all of humanity.  What a wonderful symbol of promise for a wedding! Since rainbows are also seen after a good rain, they further symbolize that we, as man and wife, would have something to look forward to following the rains of hard times. Plus they are colorful and exciting, just like us! 

With there being so many shades of the colors we chose, I spent weeks looking for ribbons that were made of similar material and represented each of the 6 shades in the perfect color.  I finally found them at Michael’s and promptly bought them. :p That night, I cut small pieces of each ribbon and affixed them onto a strip cut from an index card. For the duration of our engagement, I kept the strip near me anytime I did any wedding shopping so that everything was sure to match.  

Later I decided that we really needed an additional color to sort of "tie-in" all these neon shades.  Most people go with silver...I thought about going with black or brown.  We wound up choosing to go with a shimmery copper.  I really like the way that this looks, and it helps to tie in some of the nature stuff more smoothly.  I found a beautiful copper colored ribbon at Wal-Mart.  The color was called "Firefly"...which convinced me that we were meant to use copper, and that I had indeed made the right call on the tie-in color. :p Finding copper stuff did prove to be more challenging than I'd have liked, but I'm still glad we went with it over silver...despite how easy it was to find silver accents! 


Finding the Perfect Venue

Because we are both connected to the great outdoors with our lives, career-choices, and passions, we really wanted an outdoor wedding. We wanted it in the summer….in Texas. (No, we aren’t insane…I promise!) We looked at several outdoor places in town…some at really good prices. But the one that we had our heart set on, turned out to be the best financial decision as well! (Isn’t it great when things work out so nicely?) We decided to go with a venue that is in association with Midwestern State University (where we both worked on our degrees). The venue is known as Sikes Lake, and is a beautiful man-made pond that is surrounded by a walking trail and is home to many type of migratory birds, fish, and other wildlife despite being surrounded by residences, restaurants, and of course the university. 

Since it is owned by MSU and we are both currently students, MSU agreed not to charge us for the ceremony site to be out on the grass adjacent to the lake if we booked the Sikes Lake Center for the reception. The Sikes Lake Center is a building with an entire wall of glass that faces the lake for a spectacular view.  And backup-bonus: if it was too hot, or rained (yeah, right), or windy, or any other weather-issues arose, we could always use the SLC for an indoor ceremony with the lake view behind us, so it will be beautiful no matter what the weather throws our way!

The center was awesomely cheap considering that that included tables and chairs for 300 people and that the building itself had a max capacity of 450 people.  It also included a crew of people who would set up the tables and chairs before the event and break them down afterward. All we had to worry about was decorating and that could be done anytime the day of, and had to be cleaned up the same night.
Then, the most amazing thing happened…we discovered that there was a student discount! We were able to book the whole shebang for about the same price as our wedding cake. So we had a place, that we could afford, and that we loved. I was so excited that I literally started dreaming about decorating! (And let me tell you, I always woke up smiling. :)